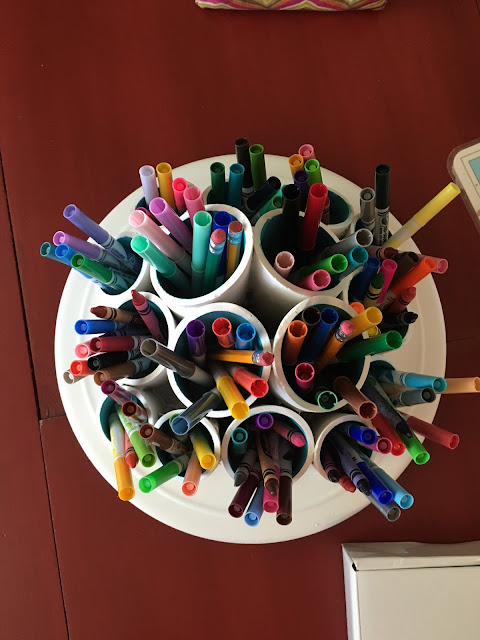
This will have to be brief, but I had a lot of people ask how I made this for the girls.
And let me tell you, it has been A BIG HIT! For all of us, because their markers aren't finding dark corners of the house to mate and create little spawn markers to hide in even more places for me to step on or pick up all the live long day.
Also: WORD OF ADVICE: If you are a very type A person this may not be the best project for you to attempt. Brent could hardly stand watching me. It requires a little fly-by-the-seat-of-your pants and a lot of don't-measure-just-wing-it kind of stuff. [I'm just picturing my sister spending about twelve weeks making this...]
Okay. Here we go. I didn't take the best pictures but I think you'll get the idea.
What you need:
PVC PIPE -
I used 2 inch and 1 1/2 inch
LAZY SUSAN
[my mother in law had one she let me use. She also said if you lived in the 70s and didn't have one of these on your table you weren't cool. Okay, those weren't her exact words. You could search garage sales, thrift stores, or buy one on amazon for about 10 bucks. I believe mine is 10 inch diameter]
LIQUID NAILS
MITER SAW
SPRAY PAINT
CRAFT PAINT
ALL THE MARKERS YOU'VE BEEN STEPPING ON AND THROWING AWAY BECAUSE THE LIDS GOT LEFT OFF
First step is to cut your PVC. I just guessed a bit-- I wanted my tallest one to be about the height of a marker [if you wanted to keep paint brushes etc you could make it a little taller] After I knew my tallest one I just cut the rest in 1/2 inch increments smaller. A few of my little ones maybe got too small but whatever, it works.
And when I say "I cut" I mean my dad cut because he has the miter saw. I just stood behind him and told him what to do. :)
Also, a miter saw cutting PVC pipe sounds like a newborn crying. At least that is what my body thought. Ask me how I know... :/!
Okay. Where was I?
You have your PVC cut. Take some sand paper and sand down the edges. You'd be amazed at how sharp that can get in spots. Once they are all sanded, clean them with soapy water and let them dry [this way you know the paint will stick]
Then get out your husband's caulk gun and some liquid nails. Arrange the pipes however you want them on your lazy susan.
Okay. This was the hardest step, and you just kind of have to wing it. I recommend gluing your middle pipes together and letting them dry. Once you have that chunk started, start gluing others to it. I glued all the pipes together and then glued the whole piece onto the lazy susan.
An extra pair of hand here would be fantastic!
Your glue will smoosh out the bottom edges. It's okay. I took a paper towel and wiped it off the best I could around the outside edges that would show, but it wasn't perfect.
Here is what I'm not good at when it comes to crafts: waiting for things to dry.
But with this one it is pretty important.
Wait several hours if you can, or overnight for it to dry. It should be a pretty solid mass.
Once everything is dry you get to spray paint!
I used a spray primer first, or you could use a spray that has a paint and primer in one.
Either way I recommend doing it outside and not in your laundry room with windows open or your house will smell like spray paint fumes for days. [That's good for a newborn, right?]
Again. Be patient. I waited for the first coat of paint to dry overnight, then did another good, heavy coat the next day. I chose white but you could obviously choose any color. A metallic may be cool to try, as it would maybe look like you made it from metal.
Once the spray paint was dry [or dry-ish, if you're impatient like me], I chose a color I liked for the inside. You wouldn't have to do this step, or you could choose lots of colors.
This was a little tricky. It was hard to leave clean lines in the bottom of the tubes, as well as around the top. I kept a damp paper towel close by and wiped the edge if I got some on it. The lines aren't perfect. Another reason a perfectionist would struggle. [As you can see in picture below]
But once it is dry and ready to go, it is so awesome you forget about the imperfections! Trust me!
Fill with your favorite drawing or craft supplies. I got the girls some of the little pip-squeak markers for the small tubes, and also filled with some crayons etc.
Voila.
You're done. Congrats. It really only took me about 2-3 hours total hands on time. Granted my dad cleaned up the mess from the cut pipes. Allow two days though at least so things can dry.
And maybe don't try to squeeze it in before a second birthday right after you've had a newborn. Just saying.
But really-- go make one! It is awesome!


2 comments:
"Ask me how I know.." I'm dying! haha, poor Mama!
I'm so impressed!
I know, second comment, but I love this spinner so much! Would you ever consider posting a few photos on how you organize/store your craft supplies? I want them to be accessible, but not TOO accessible, if that makes sense. I'd like to avoid finger paints and markers on the walls. But would love to encourage opportunity for creativity.
Post a Comment